
Steps:
- Setup and Launch EC2
- Connect to EC2
- Install Apache
- Configure Firewall
- Install MySQL
- Secure MySQL
- Install PHP
- Install phpMyAdmin
- Create MySQL User
- Secure phpMyAdmin
- Enable .htaccess
- Configure Apache
- Install cURL
- Configure SSL
- Create Database
- Install Zip/Unzip
- Download WordPress
- WordPress Permissions
- Configure WordPress
In this guide, we will demonstrate how to create a WordPress website using a LAMP stack (Linux, Apache, MySQL, PHP) on an Ubuntu 18.04 server, hosted on an AWS EC2 instance.
What is EC2?
AWS EC2 or Amazon Elastic Cloud Compute, is a web service that allows users to build websites or web applications on a virtual server called EC2 instance.
What are the benefits of hosting a WordPress website on AWS EC2?
Hosting a WordPress website on EC2 minimizes hosting costs and offers webmasters complete control over their Virtual Private Server.
The cloud infrastructure provided by Amazon EC2 is also scalable, reliable, and extremely secure.
In addition to that, for new AWS customers, Amazon offers EC2 Micro instances absolutely free of cost for the first year.
For other alternatives to AWS, you can check out our Best Web Hosting Services guide.
About this Guide
Before we delve into the details of how to program your EC2 server, you should understand how to read and implement the information in this guide.
First off, since we will be using an SSH client, the output that is generated in the SSH terminal will be displayed in this format, against a dark background.
If there is something in the output that we would like to draw your attention to, it will be highlighted in gold, just like this sentence. This will also indicate if a change needs to made to an existing code.
Next up, the code, that you must input into the SSH terminal, will be displayed in this format.
You can copy the code from this code block and paste it into your SSH client. You will only have to replace the text/values in red with your own values.
Prerequisites
Before you can create a website, it is important that you have a domain for your website.
If you do not have a domain already, we recommend purchasing domains from Namecheap, as they truly live up to their name and register domains at the cheapest prices on the planet!
As a matter of fact, Namecheap is where we purchase all our domains.
We recommend getting a .com domain for several reasons including SEO benefits. You can start searching for a domain by clicking this link.
Once you have found a domain name that is available, add it to your cart by clicking the cart button next to the domain, as shown below.

Before you proceed to the checkout, we recommend that you get an SSL certificate as well, because SSL Certificates encrypt and protect data that is sent between clients and servers and also help websites rank better in search engine results.
If you need an SSL Certificate, we recommend that you get it from COMODO (Sectigo), one of the world’s most renowned Certificate Authorities.
To get a COMODO SSL Certificate at the lowest price, click here to buy it from Namecheap.
For blogs and personal websites, PositiveSSL should be sufficient. For business websites, skip to the business section by clicking here.
After adding your domain and SSL certificate to cart, you can proceed to the checkout.
On the checkout page, we recommend setting your domain renewal to “Auto-Renew”.
We also recommend enabling the “WhoisGuard” protection subscription and setting it to “Auto-Renew” as well. It is free forever and it will keep your sensitive data safe.
The above steps are highlighted in the image below.

SSL Certificates for Businesses and Organizations
For business websites, we recommed:
- Registering the domains for at least 3-5 years.
- Enabling domain Auto-Renewal.
- Enabling the PremiumDNS for enhanced performance.
- Enabling Premium DNS Auto-Renewal.
- Purchasing SSL certificates for atleast 2-3 years.
These steps are highlighted in the image below.

Basic Commands
To be able to use the SSH client, you will need to understand some basic commands:
- To paste any code into the SSH client, press “Ctrl”, “Shift” and “v” simultaneously (“Ctrl” + “Shift” + “v”)
- To copy any code from the SSH client, press “Ctrl”, “Shift” and “c” simultaneously (“Ctrl” + “Shift” + “c”)
You are now ready to proceed to the first step.
1. Setup and Launch an AWS EC2 Virtual Server
To launch an EC2 instance, visit the Amazon AWS EC2 home page and select “Get Started with Amazon EC2”
If you are new to AWS, create a new AWS account as prompted.
After login:
1.1) Set the location of your EC2 instance/server to be as close as possible to your end users to avoid latency issues, as demonstrated below.
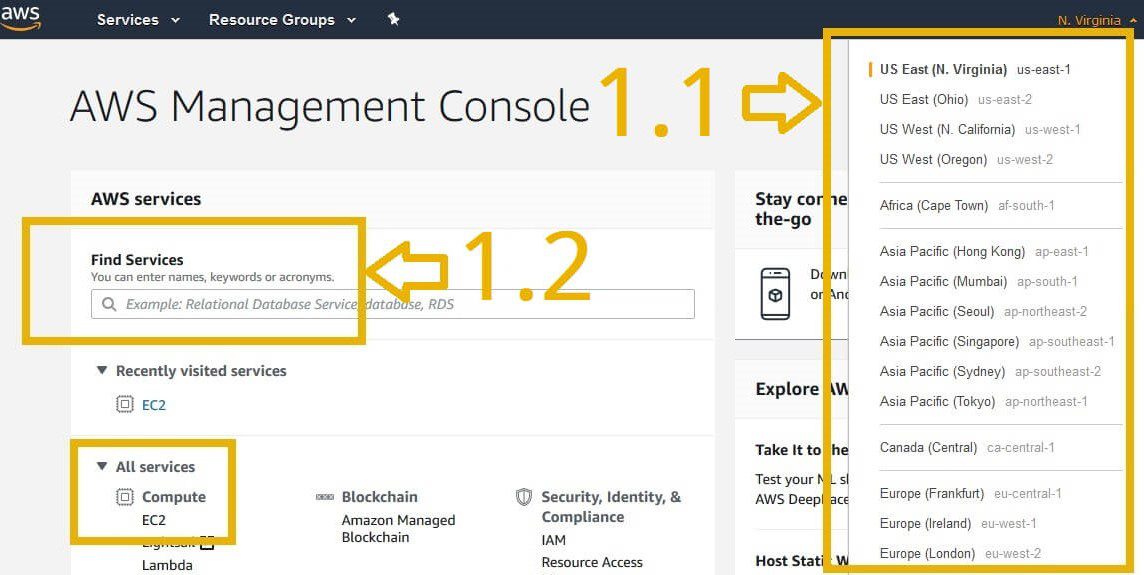
1.2) Head over to the EC2 console by searching for EC2, as demonstrated in the image above.
On the EC2 console, search for the button to launch the EC2 instance and click it.
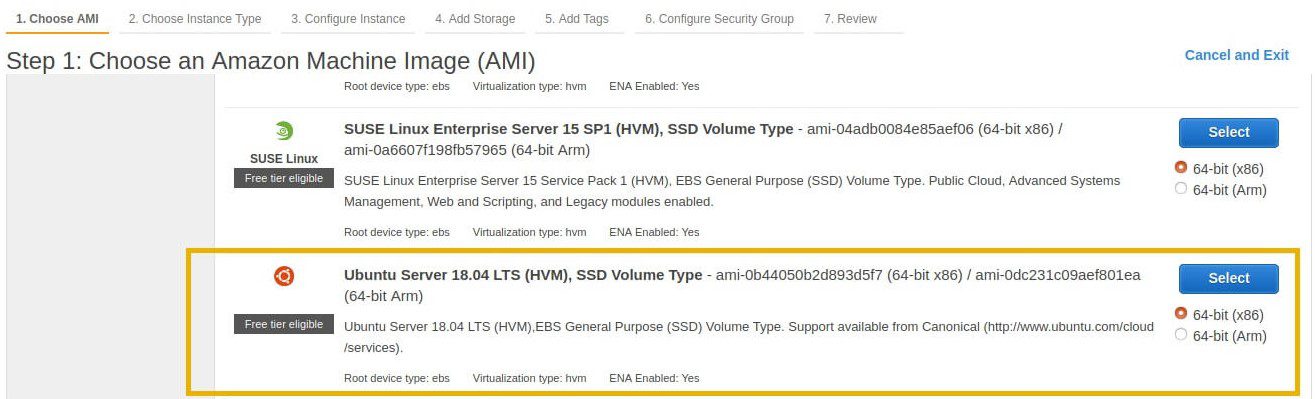
1.3) Select the Ubuntu Server 64-bit (x86) when prompted to select the Amazon Machine Image, as shown below:
1.4) In the next step, you will be asked to select an instance type. Here, you can select an EC2 instance as per the vCPUs, Memory, and Storage requirements of your project.
To avail the the Free Tier instance, you will need to select an EC2 micro instance only.
Once you have selected the required instance, click “Next: Configure Instance Details”
WARNING: DO NOT select “Review and Launch” until the last stage.
1.5) You will then be prompted to Configure Instance Details. Unless you are an advanced user and understand your project needs exactly, we recommend you to retain the default settings and just click “Next: Add Storage”
1.6) In “Add Storage”, you can specify the amount of the SSD storage space that your project(s) require. When in doubt, retain default values.
Click “Next: Add Tags” when you are done.
1.7) For the purposes of this tutorial, we will skip the “Add Tags” options. Click “Next: Configure Security Group” to proceed.
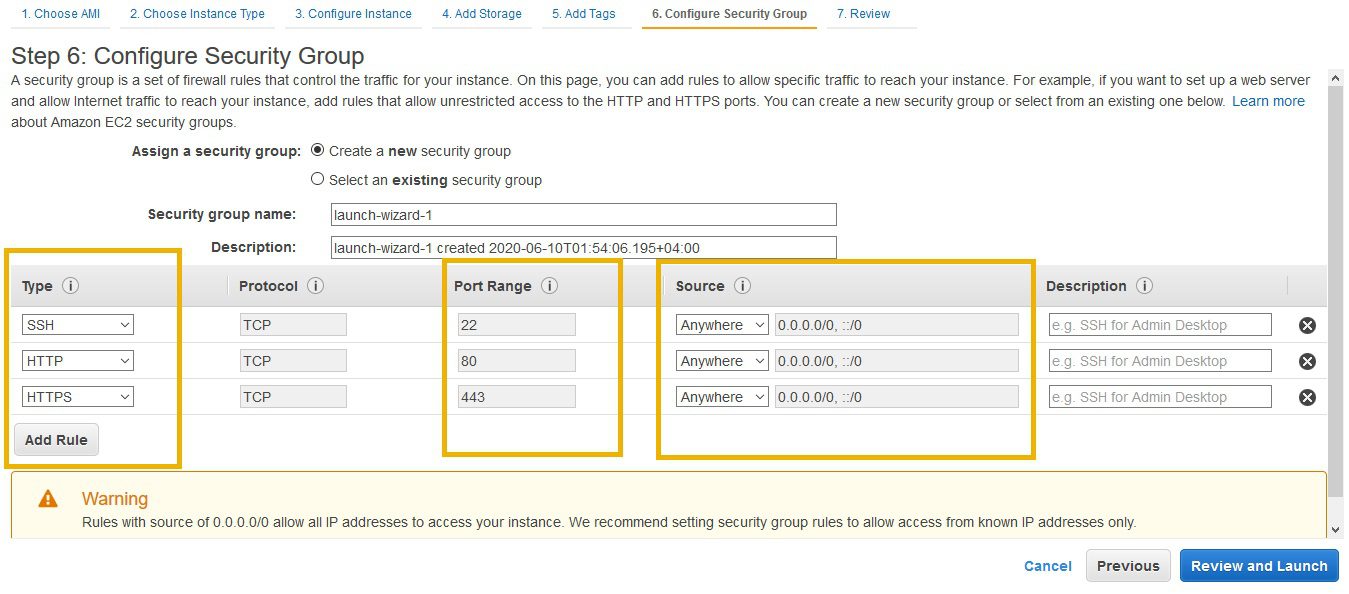
1.8) On the Security Group panel, we recommend adding firewall rules for SSH, HTTP, and HTTPS as shown below. If you are an advanced user, you may configure the security group rules to allow login from known IP addresses only. Otherwise, you may set the source to “Anywhere” to prevent getting locked out from the instance, as demonstrated here:
1.9) Click “Review and Launch” to review the details of the instance that you have configured.
After checking instance details, click “Launch” to generate a key pair, which will be used to connect to the EC2 instance.
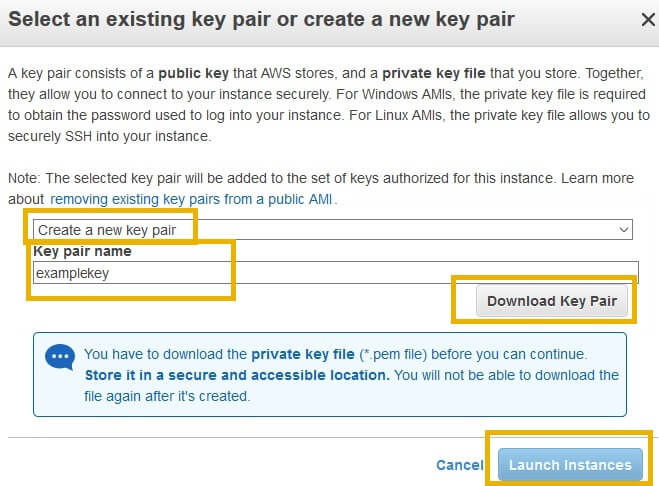
Select “Create a new key pair” and set a name for the key pair. You should download this key pair and keep it somewhere safe as this is the only way you can connect to your instance.
Finally, click “Launch Instance” to launch your EC2 virtual server.
2. Connect to your EC2 Server
Connecting to EC2 from an SSH Client on Mac OS or Linux Systems
If you are using Mac OS or a Linux OS like Ubuntu, then you can connect to your EC2 server from the Terminal, which serves as an SSH client as well.
Skip to the Windows section if you are connecting to your EC2 server from a Windows device.
Once the EC2 “Instance State” is “running”, open an SSH client and locate your private key file.
You must change permissions of this file by typing:
chmod 400 examplekey
Don’t forget to replace the “examplekey” with your key pair name.
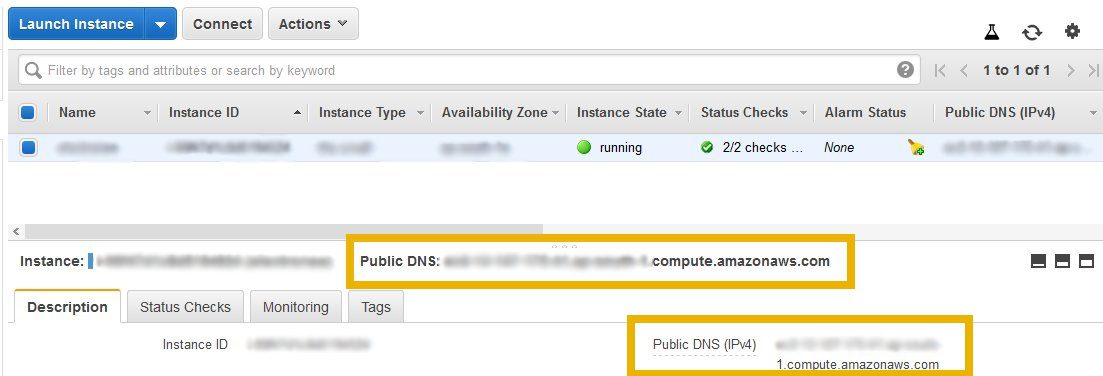
To connect to the EC2 instance, find the Public DNS of your EC2 instance, that can be found as shown in the image below.
Once you have found the Public DNS of your EC2 instance, connect to the instance using the command:
ssh -i /path/to-my-key-pair/examplekey.pem ubuntu@my-instance-public-dns-name
Replace /path/to-my-key-pair/examplekey.pem in the above code with the path to your PEM key pair.
Replace my-instance-public-dns-name with the Public DNS of your EC2 instance.
You might then be prompted to confirm the connection to the EC2 instance. Proceed by typing yes or y as needed.
Connecting to EC2 from Windows
If you are a Windows user, we recommend that you install and use PuTTY to connect to your EC2 instance.
You can download PuTTY here.
Once you have downloaded PuTTY, you can follow the official instructions from AWS on:
- how to convert your .pem private key to a .ppk for use with PuTTY using PuTTYgen.
- how to connect to your Linux EC2 instance using PuTTY.
For the exact instructions on how to do (1) and (2) above, you can download this short and precise 2-page instruction document from AWS.
Redirect Your Domain to the EC2 IP Address
At this stage, we recommend redirecting your example.com domain to the Public IP address of your EC2 server, which can be found on the EC2 panel in the IPv4 Public IP field, along with other information like the Public DNS of your EC2 server, as described above.
To redirect your example.com domain to your IPv4 Public IP, you will have to add an A record to your DNS records such that your domain points to the correct IPv4 Public IP address.
It might take some time for these changes to take effect.
In the meanwhile, we can continue configuring our EC2 server.
3. Install Apache on the Ubuntu Server
To begin with, the first thing that we need to install on the Ubuntu EC2 server is Apache, which is an open source web server that’s available for Linux servers, like Ubuntu, for free!
To install Apache on the EC2 server, enter the following command into the SSH client:
sudo apt update && sudo apt install apache2
Example Output:
After this operation, X kb of additional disk space will be used.
Do you want to continue? [Y/n]
You must respond to all such prompts in the affirmative by typing in y or yes, as per the instructions.
4. Configure Ubuntu Server Firewall
After Apache has been installed, the Firewall must be setup. The default firewall configuration for Ubuntu is the Uncomplicated Firewall or ufw, which is responsible for monitoring and controlling incoming and outgoing network traffic based on predefined security rules.
We need to allow OpenSSH and Apache Full, and then enable this configuration, using the following commands:
sudo ufw allow OpenSSH
sudo ufw allow ‘Apache Full’
sudo ufw enable
Check the status of the Firewall to ensure that our changes have been implemented:
sudo ufw status
If everything goes well, this is how it should look like:

At this stage, we need to test Apache:
sudo service apache2 status
If the output indicates that Apache is “active (running)”, then you are good to go.
Press “q” to exit if needed.
5. Install MySQL
After configuring the Firewall, you may install MySQL, which is an open-source relational database management system which enables CMS like WordPress to store and retrieve all website data.
To install MySQL, enter the following commands one by one:
sudo apt update && sudo apt install mysql-server
sudo service mysql status
If the output to the last command above indicates that MySQL is “active (running)”, then you are good to go.
6. Secure MySQL
sudo mysql_secure_installation
The mysql_secure_installation process will now begin, and you can configure the security settings as required. The first question it asks is:
VALIDATE PASSWORD PLUGIN can be used to test passwords and improve security. It checks the strength of password and allows the users to set only those passwords which are secure enough. Would you like to setup VALIDATE PASSWORD plugin?
Press ylY for Yes, any other key for No:
If you are going to use a strong password by default, then the VALIDATE PASSWORD plugin does not have to be set up.
Simply press any key other than y if you do not want to setup the plugin.
You will then be prompted to enter the root password. Choose a strong password!
Next, you will be asked if you want to remove anonymous users, to which, your response should be “y” for yes:
By default, a MySQL installation has an anonymous user, allowing anyone to log into MySQL without having to have a user account created for them. This is intended only for testing, and to make the installation go a bit smoother. You should remove them before moving into a production environment.
Remove anonymous users? (Press y|Y for Yes, any other key for No)
y
Then, you will be asked if you wish to disallow root login remotely, to which, your response should be “y” again:
Normally, root should only be allowed ta connect from ‘localhost’. This ensures that someone cannot guess at the root password from the network.
Disallow root login remotely? (Press ylY for Yes, any other key for No)
y
Next, you will be asked to remove the test database and any access to it, to which, you should respond in the affirmative with a “y” again:
By default, MySQL comes with a database named ‘test’ that anyone can access. This is also intended only for testing, and should be removed before moving into a production environment.
Remove test database and access to it? (Press ylY for Yes, any other key for No)
y
Reload privilege tables now? (Press ylY for Yes, any other key for No)
y
7. Install PHP on the Server
After securing MySQL, you should install PHP on your Ubuntu server. PHP is an open-source general purpose scripting language and is extensively used in web development. To install it:
sudo apt update && sudo apt install php libapache2-mod-php php-mysql
php -version
8. Install phpMyAdmin to manage MySQL
To manage MySQL conveniently using a graphical user interface, phpMyAdmin must be installed on the Ubuntu Server. Initiate the installation by:
sudo apt update && sudo apt install phpmyadmin
You will be asked about the web server that should be configured to run phpMyAdmin, and you should select apache2, as shown below.

When asked about configuring database for phpMyAdmin with dbconfig-common, select Yes, as shown below.

You will then be prompted to set a MySQL password for phpMyAdmin. Use a strong password and select Ok to continue.

Complete the configuration of phpMyAdmin using the following commands:
phpMyAdmin has now been successfully configured.
9. Create MySQL User
Next, you need to add a MySQL user to manage the database. To create a MySQL user:
This will take you to the MySQL monitor, where you will specify the user details.
When setting a password, we recommend that you keep the same password that you have used in Step 8 above as the MySQL application password for phpMyAdmin.
CREATE USER ‘newuser‘@’localhost’ IDENTIFIED BY ‘password‘;
GRANT ALL PRIVILEGES ON * . * TO ‘newuser‘@’localhost’;
Note down this username and password and keep it safe. You’ll need these to login to MySQL and phpMyAdmin.
To allow changes to take effect:
FLUSH PRIVILEGES;
exit
10. Secure phpMyAdmin
Now that you have installed phpMyAdmin to manage MySQL, you can visit example.com/phpmyadmin to access all the MySQL admisnstration tools offered by phpMyAdmin.
To add a level of security to phpMyAdmin, you can change its URL by modifying it in phpmyadmin.conf file. To do so:
sudo nano /etc/apache2/conf-available/phpmyadmin.conf
#phpMyAdmin default Apache configuration
Alias /your-desired-phpmyadmin-url /usr/share/phpmyadmin
<Directory /usr/share/phpmyadmin>
The phpmyadmin.conf file is shown above. You must replace the “your-desired-phpmyadmin-url” with any secure address that you prefer.
To save the file, press “Ctrl” + “x” and then “y”, followed by Enter.
To enable the changes, reload Apache using:
sudo service apache2 reload
You may now visit example.com/your-desired-phpmyadmin-url to verify the change.
11. Configure .htaccess file
Next, you will need to enable .htaccess, which is used on Apache servers to modify Apache configuration without having edit the Apache configuration files.
To enable .htaccess, follow the instructions below:
sudo apt-get update
sudo a2enmod rewrite
Open the 000-default.conf file:
sudo nano /etc/apache2/sites-enabled/000-default.conf
Paste the following part below the “Document Root” line:
<Directory “/var/www/html”>
AllowOverride All
</Directory>
To save the file, press “Ctrl” + “x” and then “y”, followed by Enter.
12. Configure Apache
After .htaccess has been enabled, the apache2.conf file must now be correctly configured. To modify this file:
sudo nano /etc/apache2/apache2.conf
Scroll down while searching for the following code:
<Directory /var/www/>
Options Indexes FollowSymLinks
AllowOverride All
Require all granted
</Directory>
Make sure that “AllowOverride” is set to “All”.
After making the required change, add the following code block just after the above code block:
<Directory /var/www/html>
Options -Indexes
</Directory>
Finally, to hide OS and Apache info, the following code needs to be added to the end of the file:
ServerSignature Off
ServerTokens Prod
13. Install cURL
Next, you should install cURL, which is a software that provides a command-line tool and library for transferring data through various network protocols.
To install cURL, input the following commands:
sudo apt-get install curl
sudo service apache2 restart
sudo apt-get install php7.2-curl
sudo service apache2 restart
Make sure that “php7.2-curl” is replaced with the appropiate version corresponding to your php version.
14. Configure SSL
To avoid mixed content errors and other SSL related problems later on, we recommend configuring the SSL Certificate before installing WordPress.
If you already have an SSL certificate, we recommend configuring it at this stage by following the exact procedure outlined below.
If you have not purchased an SSL yet, you can get a COMODO SSL certificate from Namecheap by clicking here.
Once you have downloaded the SSL Certificate File and the SSL Certificate Key File, we recommend that you save these in a seperate folder called “ssl” under “/etc/apache2”.
This is how you should do it (do not forget to replace the file names and directories appropriately):
cd /etc/apache2
sudo mkdir ssl
cd ssl
Now create a file named “example.com.crt” to save your SSL Certificate File:
sudo nano example.com.crt
Now copy the CONTENT of your SSL Certificate File, starting with something like “—–BEGIN CERTIFICATE—–” into this file and press “Ctrl” + “x” to exit and then “y” to save changes to the file, followed by the Enter key.
Similarly, now create a file named “example.com.key” to save your SSL Certificate Key File:
sudo nano example.com.key
Now copy the CONTENT of your SSL Certificate Key File, starting with something like “—–BEGIN PRIVATE KEY—–” into this file and press “Ctrl” + “x” to exit and then “y” to save changes to the file, followed by the Enter key.
If you have followed the above steps correctly, the path to your SSL files will look like:
/etc/apache2/ssl/example.com.crt
/etc/apache2/ssl/example.com.key
Now use the following grep command to find the correct SSL configuration file:
grep -i -r ‘SSLCertificateFile’ /etc/apache2
Once you have found the correct configuration file, which is usually “/etc/apache2/sites-available/default-ssl.conf” you need to update the path to “SSLCertificateFile” and the “SSLCertificateKeyFile”.
Begin by taking a backup of the original configuration file:
sudo cp /etc/apache2/sites-available/default-ssl.conf /etc/apache2/sites-available/default-ssl.conf.bak
If you type in “ls” into the command prompt, you will see these two files atleast:
- default-ssl.conf: the original SSL configuration file.
- default-ssl.conf.bak: the backup file that you just created.
Now that you have a backup, you can edit the original file:
sudo nano /etc/apache2/sites-available/default-ssl.conf
After opening the configuration file, update the paths to the SSL files, and add ServerAdmin, ServerName and ServerAlias information. Your updated file should look like this:
ServerAdmin [email protected]
ServerName example.com
ServerAlias www.example.com
…
SSLCertificateFile /etc/apache2/ssl/example.com.crt
SSLCertificateKeyFile /etc/apache2/ssl/example.com.key
To allow these changes to take effect and to configure additional recommended settings, use the following set of commands:
At this stage, we need to ensure that there are no syntax errors in our files. We can do so with the help of the following command:
If the above command returns a result like “Syntax OK”, we can proceed to restart Apache:
sudo systemctl restart apache2
sudo service apache2 restart
Now head over to the website to check if the SSL certificate has been installed and if everything is working correctly. If the SSL has been correctly installed, the padlock icon should appear in the browser.
Configuring the SSL correctly can be very challenging for beginners, and if you encounter any problems, please do not hesitate to send an email to [email protected]
15. Create a MySQL Database for WordPress
To run a WordPress website, a MySQL database needs to be created. The easiest way to create the database is using phpMyAdmin that you have set up earlier.
Go to example.com/your-desired-phpmyadmin-url and login to your phpMyAdmin with the username and password of the MySQL user that have you previously created.
On the dashboard, click on the “Databases” tab as shown below.

To create a database, simply type a name for your database and click “Create” as shown below.

Doing so will successfully create a database that WordPress can utilize. Note down the name of the database, as this will be required in later stages.
16. Install Zip/Unzip
Before you can download and install WordPress, you need to install the Zip Unzip software, using these commands:
sudo apt-get update
sudo apt-get install zip unzip
You are now ready to download WordPress.
17. Download WordPress
We recommend downloading WordPress in the “tmp” folder. To do so, use the following commands:
cd /tmp
curl -O https://wordpress.org/latest.tar.gz
This downloads a compressed version of WordPress files onto your server.
To extract WordPress files:
tar xzvf latest.tar.gz
Before you move these files to the WordPress root directory, you will need to make a few modifications.
First, you should delete the sample Apache index.html page in the WordPress root directory.
To do this, we recommend using the root user instead of ubuntu. To enter root user mode:
sudo -s
Now go to the WordPress root directory using the command:
cd /var/www/html
To reveal the contents of this folder, type in:
ls
You will immediately see that a file named “index.html” already exists. Since WordPress does not require this file, you can delete it with the following command:
rm index.html
This will delete the “index.html” file. You can verify this by using “ls” again, if you prefer.
Now go back to the “tmp/wordpress” directory using the command:
cd /tmp/wordpress
To start functioning correctly, WordPress requires a file called wp-config.php to be configured.
Although we will be configuring this file in a while, you need to create this file first using the command:
cp /tmp/wordpress/wp-config-sample.php /tmp/wordpress/wp-config.php
You may type in “ls” into the terminal to ensure that this file has been created.
You should also add a dummy .htaccess file so that WordPress can utilize it later:
touch /tmp/wordpress/.htaccess
You may type in “ll” into the terminal to ensure that this file has been created.
Similarly, you can also add a folder called “upgrade” so that WordPress can utilize it later:
mkdir /tmp/wordpress/wp-content/upgrade
Although you should still be in the root user mode, we will add a sudo to every command just in case.
You can now copy these WordPress files into the root directory using the command:
sudo cp -a /tmp/wordpress/. /var/www/html
Now go back to the WordPress root directory using the command:
cd /var/www/html
18. Set WordPress Permissions
Before you start configuring WordPress files, you will need to assign ownership to the “www-data” user group to enable Apache to read and write WordPress files and to perform updates.
Use the following command to do so:
sudo chown -R www-data:www-data /var/www/html
To assign correct permissions on the WordPress directories and files, use the following commands:
sudo find /home/caweem/htdocs/caweem.com/ -type d -exec chmod 750 {} \;
sudo find /home/caweem/htdocs/caweem.com/ -type f -exec chmod 640 {} \;
Now, you are ready to start configuring WordPress files.
19. Configure and Install WordPress
To configure WordPress, you will need to modify the wp-config.php file.
The first thing you will need to add to the wp-config file is a secure key that is generated by the WordPress secret key generator.
To generate this secure key, simply enter the following command into the SSH client:
curl -s https://api.wordpress.org/secret-key/1.1/salt/
Doing so will generate a secret key that looks like the following:
define(‘AUTH_KEY’, ‘GENERATED KEY’);
define(‘SECURE_AUTH_KEY’, ‘GENERATED KEY’);
define(‘LOGGED_IN_KEY’, ‘GENERATED KEY’);
define(‘NONCE_KEY’, ‘GENERATED KEY’);
define(‘AUTH_SALT’, ‘GENERATED KEY’);
define(‘SECURE_AUTH_SALT’, ‘GENERATED KEY’);
define(‘LOGGED_IN_SALT’, ‘GENERATED KEY’);
define(‘NONCE_SALT’, ‘GENERATED KEY’);
Now open up a text editor like Notepad on your desktop and copy these values into the text editor, as you will need to paste these in the wp-config file.
To modify the wp-config.php file:
sudo nano /home/caweem/htdocs/caweem.com/wp-config.php
The first thing that you should add to this file is the MySQL database name, MySQL database username and MySQL database password, that you have defined in the preceeding steps.
Search for a section that looks like the following:
/** MySQL database username */
define(‘DB_USER’, ‘newuser‘);
/** MySQL database password */
define(‘DB_PASSWORD’, ‘password‘);
Here, you must replace “example-db“, “newuser” and “password” with the values that you have previously defined.
Next, search for the dummy key values in the wp-config.php file that looks like:
define(‘AUTH_KEY’, ‘VALUES COPIED FROM THE COMMAND LINE’);
define(‘SECURE_AUTH_KEY’, ‘VALUES COPIED FROM THE COMMAND LINE’);
define(‘LOGGED_IN_KEY’, ‘VALUES COPIED FROM THE COMMAND LINE’);
define(‘NONCE_KEY’, ‘VALUES COPIED FROM THE COMMAND LINE’);
define(‘AUTH_SALT’, ‘VALUES COPIED FROM THE COMMAND LINE’);
define(‘SECURE_AUTH_SALT’, ‘VALUES COPIED FROM THE COMMAND LINE’);
define(‘LOGGED_IN_SALT’, ‘VALUES COPIED FROM THE COMMAND LINE’);
define(‘NONCE_SALT’, ‘VALUES COPIED FROM THE COMMAND LINE’);
Here, you must replace “VALUES COPIED FROM THE COMMAND LINE“, with the values that have been generated for you by the WordPress key generator.
Finally, to prevent WordPress from asking for FTP credentials unnecessarily, add the following code to the same wp-config file:
define(‘FS_METHOD’, ‘direct’);
Save the changes you have made to the configuration file using “Ctrl” + “x” and “y”, followed by Enter.
The WordPress Famous Five Minute Install
From here on, you get to experince the sheer simplicity of the famous WordPress five minute install.
Simply head over to your website example.com and continue to install WordPress there.
Select the language, and specify a site title, a username, a password, and your email.
Finally, click “Install WordPress” and you are good to go!
To day I successfully installed wordpress following your tutorial. There were few typos but I could do it successfully. Thanks
Hi Pradeep.
Its good to know that you found our tutorial helpful. Can you please point out what those typos are, if any? Thanks 🙂